API Authentication
Access tokens authenticate your requests to the Broadcast API. Each token can be configured with specific permissions to control what actions it can perform.
How Access Tokens Work
Access tokens are API keys that:
- Authenticate requests to the Broadcast API
- Control access through granular permissions
- Can be created, refreshed, and revoked at any time
- Are scoped to a specific broadcast channel
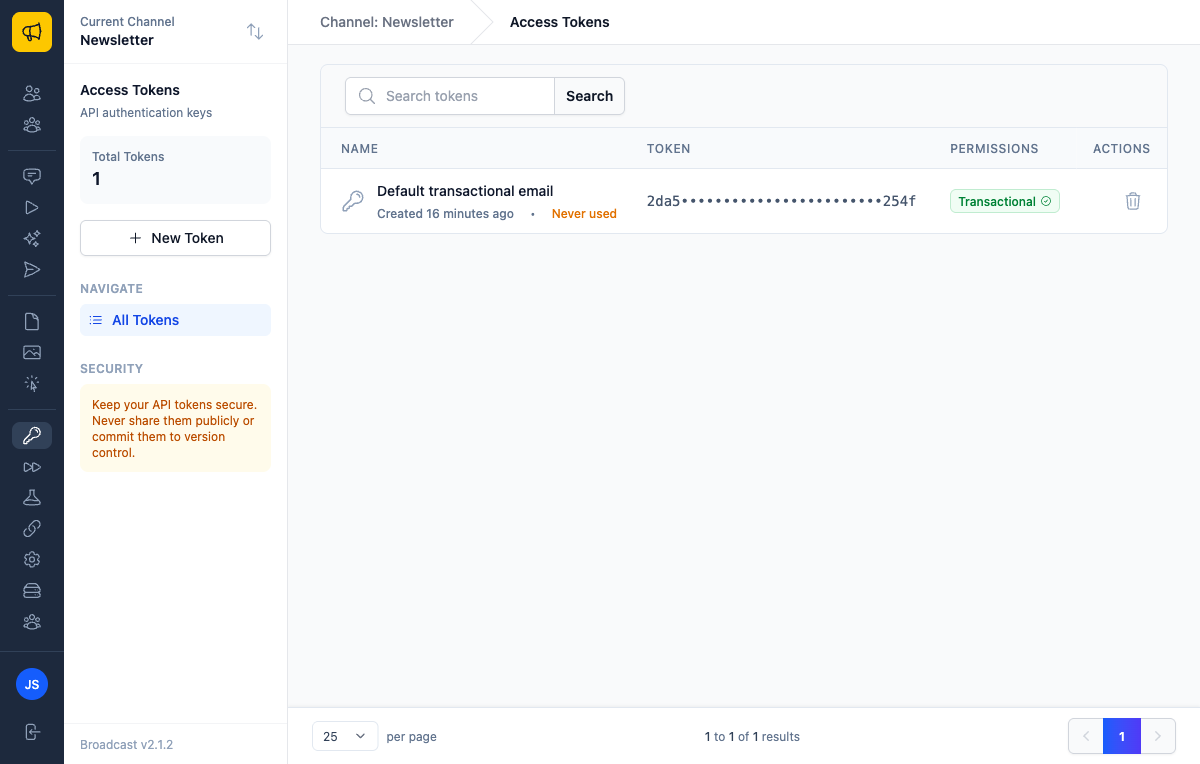
When you install Broadcast, a default access token is created with transactional email permissions. You can create additional tokens with different permission sets for various use cases.
Creating an Access Token
To create a new access token:
- Navigate to Access Tokens in the sidebar
- Click New Token
- Enter a descriptive name (e.g., "Production API", "Transactional emails")
- Select the permissions this token needs
- Click Create token
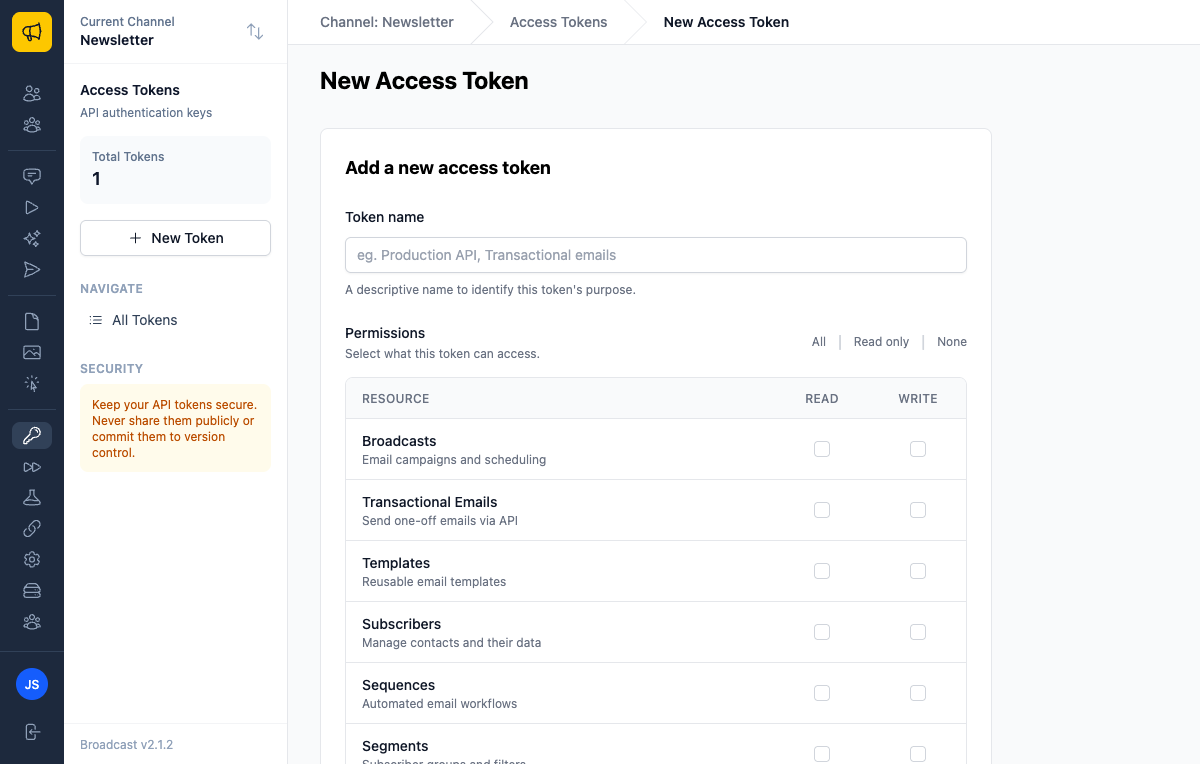
Token Permissions
Each resource type has two permission levels:
| Permission | Description |
|---|---|
| Read | List and view resources |
| Write | Create, update, and delete resources |
You can set permissions for the following resources:
| Resource | Description |
|---|---|
| Broadcasts | Email campaigns and scheduling |
| Transactional Emails | Send one-off emails via API |
| Templates | Reusable email templates |
| Subscribers | Manage contacts and their data |
| Sequences | Automated email workflows |
| Segments | Subscriber groups and filters |
| Email Servers | SMTP and delivery settings |
| Opt-In Forms | Subscription forms and widgets |
| Webhook Endpoints | Real-time event notifications |
Best practice: Create tokens with only the permissions they need. A token for sending transactional emails doesn't need access to broadcasts or segments.
Quick Permission Selection
When creating or editing a token, use the quick selection buttons:
- All - Enable all read and write permissions
- Read only - Enable only read permissions for all resources
- None - Disable all permissions
Using an Access Token
Include your access token in the Authorization header of every API request:
Authorization: Bearer YOUR_ACCESS_TOKEN
Example Request
curl -X GET "https://your-broadcast-instance.com/api/v1/subscribers" \
  -H "Authorization: Bearer 8779fc02262b9701fe0fff82f1eec8b9" \
  -H "Content-Type: application/json"
Error Responses
| Status Code | Description |
|---|---|
| 401 Unauthorized | Missing or invalid token |
| 403 Forbidden | Token lacks required permissions |
| 429 Too Many Requests | Rate limit exceeded |
Rate Limiting
The API enforces rate limiting to protect against abuse and ensure fair usage for all users.
Limits
| Scope | Limit |
|---|---|
| Per API token | 1,200 requests per minute |
Each API token has its own independent rate limit. Using multiple tokens allows for higher overall throughput if needed.
Rate Limit Headers
Every API response includes rate limit headers so you can monitor your usage:
| Header | Description |
|---|---|
X-RateLimit-Limit |
Maximum requests allowed per period |
X-RateLimit-Remaining |
Requests remaining in current period |
X-RateLimit-Reset |
ISO 8601 timestamp when the limit resets |
When you receive a 429 Too Many Requests response, the following additional header is included:
| Header | Description |
|---|---|
Retry-After |
Seconds until you can retry |
Example Rate Limited Response
{
  "error": "Rate limit exceeded. Please retry later."
}
Handling Rate Limits
When you receive a 429 response:
- Check the
Retry-Afterheader for how long to wait - Implement exponential backoff in your retry logic
- Consider batching requests where possible
- Use multiple tokens if you need higher throughput
# Example retry logic
def make_api_request
  response = api_call

  if response.status == 429
    retry_after = response.headers['Retry-After'].to_i
    sleep(retry_after)
    retry
  end

  response
end
Viewing Token Details
Click any token in the list to view its details:
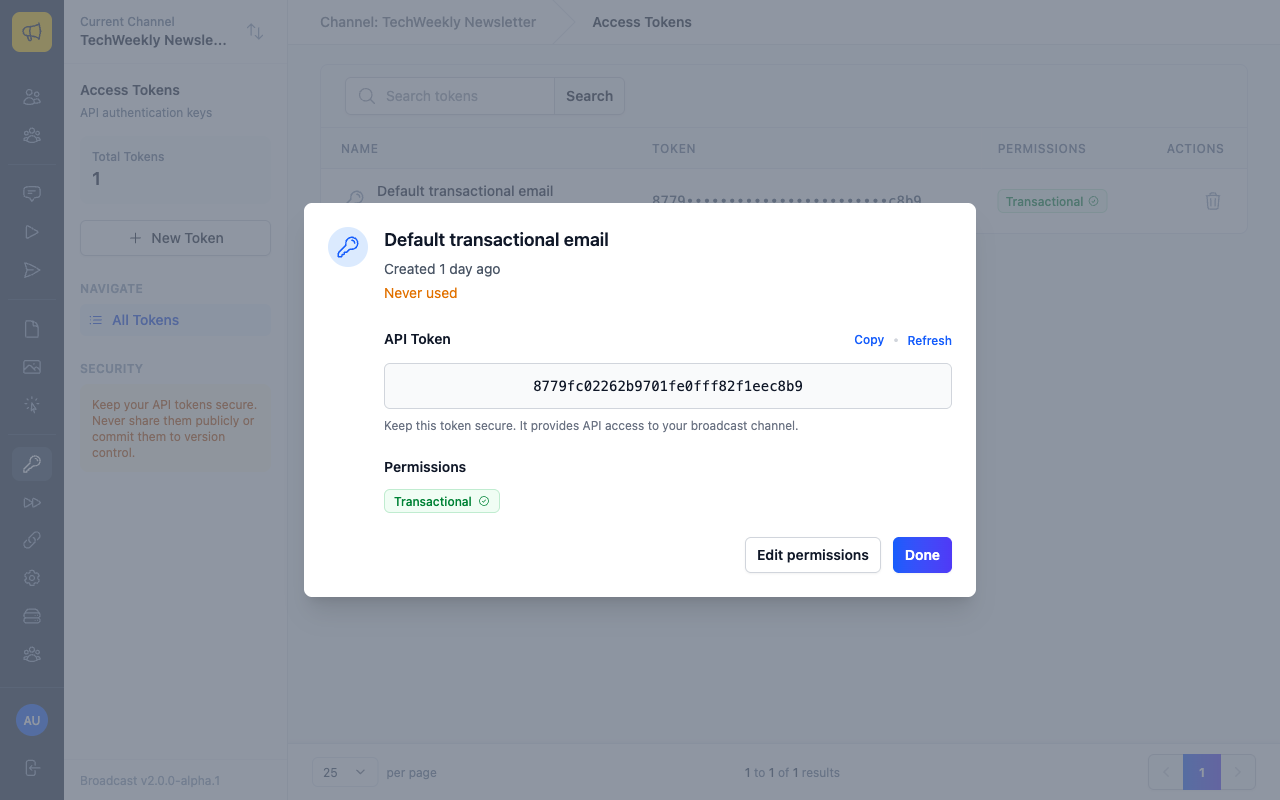
The detail view shows:
- Full token value - Click Copy to copy to clipboard
- Permissions - What this token can access
- Usage stats - When the token was created and last used
Managing Access Tokens
Refreshing Tokens
You can regenerate a token's value while keeping its permissions:
- Click on the token you want to refresh
- Click Refresh
- Confirm the refresh
- Copy the new token value
Warning: Refreshing a token immediately invalidates the old value. Update all applications using this token before refreshing.
Editing Permissions
To change a token's permissions:
- Click on the token
- Click Edit permissions
- Update the permission checkboxes
- Click Update token
Deleting Tokens
To revoke a token permanently:
- Click the delete button (trash icon) next to the token
- Confirm the deletion
Deleted tokens cannot be recovered. Any applications using the deleted token will immediately lose access.
Security Best Practices
- Use descriptive names - Make it easy to identify what each token is used for
- Minimize permissions - Only grant the permissions each token actually needs
- Rotate regularly - Refresh tokens periodically, especially after team changes
- Never commit tokens - Keep tokens out of version control and public repositories
- Use environment variables - Store tokens in environment variables, not in code
- Monitor usage - Check the "last used" timestamp to identify unused tokens
- Revoke unused tokens - Delete tokens that are no longer needed
Common Use Cases
Transactional Emails Only
For sending transactional emails (password resets, receipts, etc.): - Transactional Emails: Read + Write
Subscriber Management Integration
For syncing subscribers from another system: - Subscribers: Read + Write - Segments: Read (optional, to assign subscribers to segments)
Read-Only Dashboard
For a reporting dashboard that displays metrics: - Broadcasts: Read - Subscribers: Read - Sequences: Read
Full API Access
For admin tools that need complete access: - All resources: Read + Write
Note: Only use full access tokens when absolutely necessary.